Raman Microscope construction.

Raman Microscope Part List
|
|
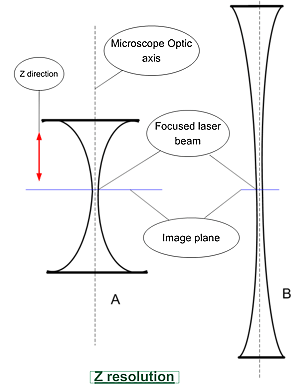
Comments:One important think when setting up a Raman microscope is to focus the laser beam at the center of the microscope field with a high power objective like the Olympus 50X NA 0.85. In this design, the position of the laser can be moved in 4 directions (1c, 1d, 1e) : vertically and horizontally without changing the direction of the laser tube; the tube can also be tilted in a vertical and horizontal plane. Much resources can be found for such a design in the equipment sold for amateur astronomy. Good parts can been found at a price generally much lower than the professional microscopy components. For this mechanical assembly of the laser positioning, I used dovetail bars, a guiding telescope assembly, the focuser of an old photographic enlarger for the vertical motion and the stand of my old drilling machine repainted in black for a better look. The first design of this Raman microscope has been made without any spatial filter assembly. In that case, the laser beam reaches directly the microscope objective lens and is parallel to the optic axis. In that way there is minimum focusing action of the objective. Consider a beam very narrow and moving on the optic axis of a lens, it continues its way on the same line after passing through the lens, there is in fact nearly no focus if the width of the beam is sufficiently small. The image of this hypothetical beam is always a point whatever the distance to the lens. In practice this never happens because the beam has a finite width but when a narrow parallel beam is focused, the cone of light thus generated reach the focal plane with a small angle. If the light beam covers fully the pupil of the objective, the focused beam reaches the sample with a higher cone angle and the Z resolution is better. The small diagram below illustrates the Z resolution problem: |
|
|
|
This figure represents the light beam coming out the microscope objective, being focused onto the sample surface and diverging into a transparent crystal below the surface for two different light cone angles. In case A on the figure, the beam is strongly focused on the sample plane. At small distance below the sample plane, the light is defocused and will be partly blocked by the entrance slit of the spectrograph. In case B, where the beam cone angle is small, the light remains in focus on a larger Z distance. The light coming from greater sample depth can enter the spectrograph so Z resolution is lower. For that reason, it is always advised for best results with Raman microscopy to use a high numerical aperture objective which increases the cone angle of the light beam. |
|
For the reason described above, I have added at the laser exit the
Edmund optics spatial filter (3)
with the pinhole removed and replaced by a second short focal range
objective especially designed for He-Ne laser. Both objectives have the same
focal length. The laser beam is focused between the objectives and can
be made slightly divergent by adjusting the position of the second lens.
It improves the focus of the beam which has a diameter of 2 to 5µ with
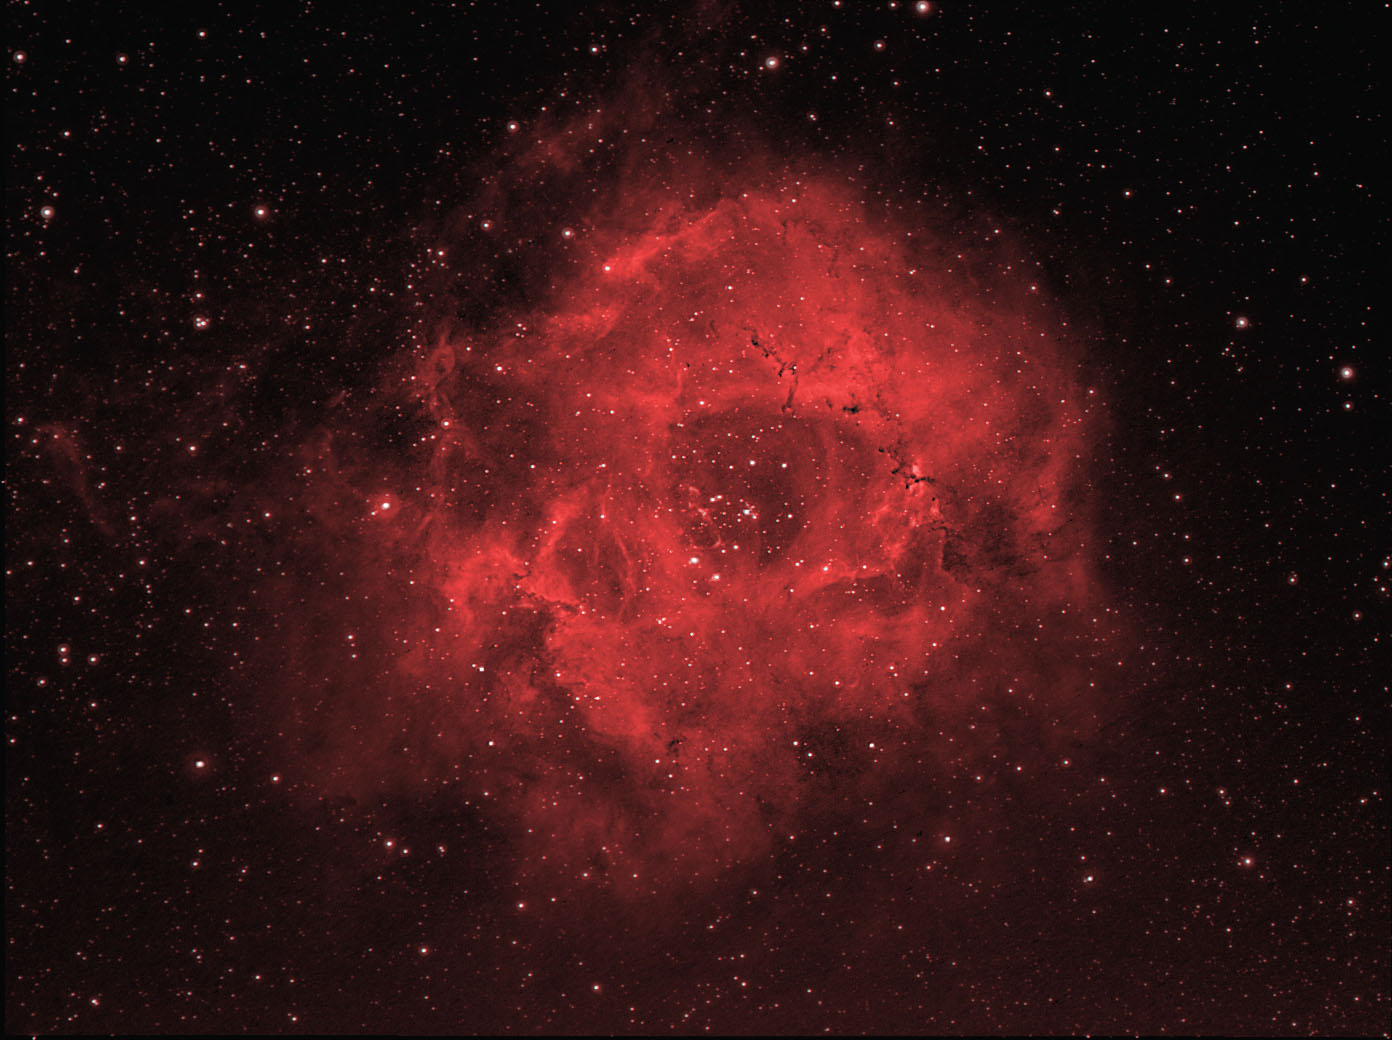
the 50X NA 0.85 microscope objective. The beam splitter assembly (7) and laser rejection filter (8) are described in more details on next page. As seen on the photograph above, this assembly is now part of the microscope column. To do that it is absolutely necessary to use an infinity corrected microscope's optics so accessories can be introduced between objective and microscope head without disturbing the image. The height of the beam splitter head is around 15 cm which is outside the specifications given by Olympus. Even in those conditions, I did not notice any significant image deformation. The second flip mirror (10) is equipped with a small neon bulb (9) for reference and to the left by a photo eyepiece to refocus the light onto spectrograph entrance slit. At the end of the beam splitter tube, a removable cylinder (an astronomical accessory from Orion) gives access to the entrance slit. With the help of an external lens (20) and the X-axis Stage (19), the focused spot can be precisely centered on the entrance slit by moving slightly the front of the spectrograph. The spectrograph (12) used in the present device is certainly not optimized but as I said before, I tried to use available components as far as possible to demonstrate the possibilities of Raman microscopy before optimizing all devices. The Jobin-Yvon H20 used in this experimental arrangement is not a spectrograph but a scanning monochromator with entrance and exit slit. In normal use, the image of the entrance slit is formed in the plane of the exit slit. I have removed the exit slit to record a band spectrum and not a single wavelength in the monochromator mode. It was not possible for mechanical reasons to place directly the CCD detector (16) in the image plane of the spectrograph. On the other hand, the direct imaging on a CCD detector with such a spectrometer optics is not suitable because the image provided by the concave grating is too large so only a small portion of the spectrum can be recorded at a time ( about 35 nm) and the image intensity is too faint for Raman spectroscopy. To overcome this problem, a demagnification with an additional lens was necessary. I have chosen to photograph the spectrometer image ( virtual object ) as usually done in photo macrography that is with a bellow (14b) and macro lens (15) (Zuiko makro f2 for OM system). The biggest drawback of this optics is the vignetting produced by both bellows (14a and b). I'll describe this limitation later when presenting the first results. The CCD (16) detector is an astronomical camera cooled by Peletier around 30°C below ambient temperature ( Atik 16HR equipped with a SONY ICX285 CCD sensor 1392x1040 pixels ). I used this device first to make some astronomical pictures of faint nebulae. As it allows to record images of faint objects barely visible with a telescope in the light polluted sky of Belgium, I decided to try it for Raman spectrography. I have reported below an example image I have made with this camera with a narrow band H alpha filter of such a faint object. (Rosette nebula). With such a camera, it is possible to make binning of the pixels that is to add the charge of some adjacent pixels directly on the CCD chip to improve the signal to noise ratio. I'm using a 8x1 binning to add 8 pixels in a column. This is necessary again due to the low intensities of Raman spectra. After setting up the components, the optics must be aligned starting from the laser output. Both objectives of the spatial filter (3) must be aligned vertically with the 2 screws provided so that optic axes are perfectly collinear. The dichroic beam splitter (7) should make an angle of 45° with the laser beam in order to minimize transmitted laser intensity and thus maximize reflection. The position of the laser head is then adjusted (1c, 1d, 1e) so the beam is focused at the center of microscope stage (6). The first step is to bring the laser beam at the center of the field with the microscope objective being removed. Then in succession, microscopes objectives of increasing power can be used with an adjustment of the laser beam at each step. Finally, the beam width is adjusted with the spatial filter micrometric screw to minimize laser spot size. With a properly aligned laser beam, the spectrometer can be tested with a high Raman scatterer. For that purpose, I'm using a section of the mineral crocoite (a lead chromate) which gives a very high Raman effect, more than sulfur. With this mineral, a Raman spectrum is collected in a few tens of a second so the spectrometer alignment can be set in real time.
|
|
|
Rosette nebula. |
|
Previous page Next Page Raman Main Page